Wednesday, May 25, 2011

Angel Food Cake

 
I have to admit that I love rich, decadent, gooey desserts filled with caramel, chocolate and other ingredients that make them almost sinful. Every now and then I like to go a little simpler and that’s when I go to plain vanilla or chocolate ice cream, pound cake and angel food cake.

Lately I’ve been making a lot of potato soup, trying to perfect my mom’s recipe, and since her recipe calls for rivels, I’ve been using a lot of egg yolks which means I now have acquired a large supply of egg whites. In the past I would have just tossed the egg whites knowing that I would probably never use them, but lately I’ve been trying to be more thrifty and less wasteful so have been freezing the egg whites. I hadn’t thought much about what I would do with the abundance of egg whites that was quickly taking up valuable freezer space until one day when I started craving angel food cake.
I don’t believe I’ve ever eaten homemade angel food cake, when I go out to eat and if I have room, I go with one of those yummy rich desserts, I know I’ve never made one however, I did use a box mix to make one at least once or twice. I don’t remember my mom ever making one either, she didn’t do a whole of baking from scratch by the time I came around, although she must have years before because I have her tube pan. She and I usually just bought our angel food cakes from the supermarket, which really aren’t too bad. So I began my search for a recipe. I pulled out my old, old Betty Crocker cookbook, I always turn to the old faithful’s (Betty Crocker, Fannie Farmer or Joy of Cooking) at times like this and they rarely fail to provide me with instructions on basic cooking and baking. I began and ended my search with Betty Crocker; I not only found one but two recipes, not to mention several sponge cake recipes as well.
Angel Food Cake Deluxe
Printer Friendly Version

1 cup cake flour
1 1/2 cups confectioner's sugar
12 egg whites, (1 1/2 cups)
1 1/2 teapoons cream of tartar
1/4 teaspoon salt
1 cup granulated sugar
1 1/2 teaspoon vanilla
1/2 teaspoons almond extract

1. Heat oven to 375 degrees. Stir together flour and first amount of sugar; set aside.

2. In large mixer bowl, beat egg whites, cream of tartar and salt until foamy. Add second amount of sugar, 2 tablespoons at a time, beating on high speed until meringue holds stiff peaks. Gently fold in flavorings. Sprinkle flour-sugar mixture 1/4 cup at a time over meringue, folding in gently just util flour-sugar mixture disappears. Push batter into an ungreased tube pan 10x4 inches. Gently cut through batter.

3. Bake 30 to 35 minutes or until top springs back when touched lightly with finger. Invert tube pan on funnel, let hang until cake is completely cool.

Oven Temperature: 375°F

Source: Betty Crocker's Cookbook
Copyright: 1969 Twenty-first  Printing 1974

I've had this cookbook for a long time, it's probably the first or second one I owned. My mother gave it to me when I was in high school or a year or two after I graduated so it would have been sometime in the mid to late 70's. The funny thing is, at that time I wasn't much into cooking so rarely used it but Mom did, she used it mostly for her apple and cherry pies. I hadn't looked at this book in several years and when I decided to make an angel food cake, pulled this one off of the bookcase to find a recipe. I got carried away by just looking through it....most of the recipes are recipes that require actual cooking with a few that require some type of pre-packaged addition. No microwave instructions at all, unlike so many of the newer cookbooks.
One cup cake flour.
1 and 1/2 cups confectioners sugar
Stir together the flour and confectioners sugar.
Twelve egg whites.
Egg whites, cream of tartar and salt.
I know it isn't easy to see this, but the egg whites, cream of tartar and salt were beat until foamy.

Add the granulated sugar, 2 tablespoons at a time and beat meringue on high speed until it forms stiff peaks. I know, I forgot to take a picture of the sugar being added because I'm just forgetful that way. I'm sure you can picture it yourself.

Isnt' this pretty? I think it is....I love how satiny, smooth and creamy it looks.

If you have a stand mixture, I highly recommend that you use that at this time. I used a good hand mixer and it took a long time for the mixture to form stiff peaks, I’m sure my stand mixer would have accomplished this much quicker.
I use "pure" vanilla and almond extracts....I just like them more than imitation.


Gently fold in flavorings and flour mixture. I’m not sure I can explain how to fold but I’ll try. I use a rubber spatula and gently cut into the middle of the meringue, go to the bottom of the bowl swiping the bottom and side as you pull up. I do this while turning the bowl each time…you don’t want to stir because that will cause the meringue to deflate. You want to keep as much air in the meringue as you can. I saw an America’s test kitchen that showed them using a balloon whisk to do this. You can search the internet and YouTube for instructions and videos that show this procedure. I’m constantly amazed at all cooking videos on YouTube.

This was my mom's tube/angel food cake pan. There are tube pans that come in one piece but I like this one because it is two pieces, it makes removing the cake much easier.

Still working gently, scrape the batter out of the mixing bowl and push into an ungreased tube pan. Take a knife and cut through the batter. I think I can explain this process a little better than folding, then again, maybe not. Insert the knife blade about halfway into the batter and drag the blade through the batter while turning the tube pan.
Bake 30 to 35 minutes or until top springs back when touched lightly with finger.


Invert tube pan on funnel, let hang until cake is completely cool. If you don't have a funnel, you can use a glass bottle. Another thing I like about this tube pan is that it has these little legs on it eliminating the need to use a funnel.

Pay no attention to the reflection of that woman in the pan. Try as I might, I couldn't keep my image out of there so I guess you're stuck with it. If I had known this would have happend, I would have dressed better and done something with my hair.....scary, I know.
Once the cake has cooled, run a knife or metal spatuala around the rim of the pan (between the cake and the pan) and remove the cake. The third and final thing I like about this pan is that it makes it very easy to remove the cake. Once I run my spatual around the rim of the pan, I remove that and then run the spatula along the bottom (between the pan bottom and the cake) to loosen and remove.


Success....my very first Angel Food cake! I like to serve this with fruit or eat it just by itself. Today I took a bag of frozen strawberries, mashed them up a little and added some sugar...yum!

Wednesday, May 18, 2011

Potato Soup with Rivels

Potato soup is one of my favorite soups and I’ve had and enjoyed many kinds….baked potato, cheesy, cream of potato soup, etc., but my mom’s is still my favorite and up until the last six months or more, I had never made it. As with most of the dishes my mother made, she didn’t have a recipe for this so I needed to try to find something similar and go from there. My mom was a plain and simple cook, she didn’t use spices or any unusual ingredients so I knew that her soup wouldn’t be difficult to make but I just had to figure out the procedure….I already had some idea of what most of the ingredients were. I knew that she used potatoes, of course, onion, canned evaporated milk and seasoned it with salt. She also made something like a noodle or dumpling that she added to her soup that she made using eggs and flour. Other than that, I was clueless.

My search began with my sister Jean, she has made this potato soup before and I also had a recipe from someone I used to work with, that was similar, so I took some of what my sister told me and some of my coworkers recipe and combined them. Between these two recipes I had the ingredients and the procedures for the soup but couldn’t get the hang of making the rivels (Mom didn’t call them rivels and I can’t remember what she did call them, but that's the name that was used in most of the recipes I found) so I pressed on. I eventually found the instructions in and Amish recipe that I located in a regional cookbook that covered the northeastern part of the US, and also from a blog I follow and her recipe was from her German heritage…at last success!
Potato Soup with Rivels
Print Recipe
1 large onion, diced
8  medium-sized potatoes, peeled and cut into bite sized pieces
water, enough to cover the potatoes and onions
salt  to taste
2-3 cans evaporated milk, (12 ounces each)
1 stick butter

Rivels (Dumplings/Noodles)
4 egg yolks
1/2-3/4 cup flour

1. Dice onions and place in a large pot.
2. Peel and cut potatoes into bite sized cubes and put in pot with the onions.
3. Put enough water in the pan to just cover the potatoes and onions, add salt. Cook until the potatoes are tender.
4. DO NOT DRAIN WATER
5. Add evaporated milk. and butter. Cook and stir until thoroughly heated.
6. To make Rivels - Add flour to eggs and toss and stir until almost dry. Mixture looks like small dumplings/noodles. Gradually drop mixture into the soup. Cook for about five minutes, until the Rivels are done, stirring frequently.
7. Add more salt if desired.

Tips:
If you like thicker soup, add leftover mashed potatoes or instant mashed potatoes until soup reaches the desired consistency.
When adding instant potatoes, under cook potatoes a little then add the instant potatoes after the milk and butter and before adding the rivels. Cook until the soup thickens.
Can add chunks of ham.
This makes a lot of soup so unless you like leftovers or are feeding several people, you may want to cut this recipe in half.
Put chopped onion in a large saucepan or dutch oven.

Add potatoes
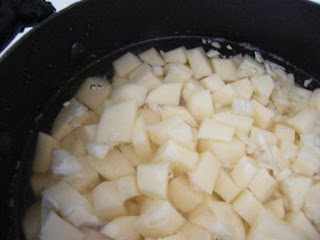
Cover potatoes with water.
Add salt. I know this looks like a lot but it really isn't, I still needed to add more later.
Cook potatoes until tender, do not drain, leave the water in the pan and add 2 to 3 cans of evaporated milk. If adding instant potatoes as a thickener, under cook the potatoes a little because the soup will need to cook a little longer.
Add 1 stick of butter cook until thoroughly heated.
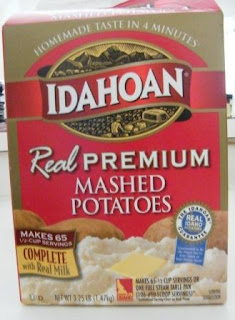
I don't normally use instant potatoes since I prefer making my mashed potatoes from the real thing. A friend told me that she really likes this brand because they taste just like fresh, she even served them for Thanksgiving and couldn't tell the difference. So I decided to use them in the soup and they worked great. Guess I'll continue to keep a box on hand just for this purpose.
My mother never added any type of thickener to her soup, but Michael likes his thicker so I decided to try adding some instant mashed potatoes. I had read that you can use mashed potatoes or instant mashed potatoes to thicken soups. I used about a half cup of instant potatoes and cooked until the soup was nice and creamy looking. If you like an even thicker soup, just add more until you reach the desired consistency.

While the soup is cooking make the rivels. "What are rivels you ask?", they remind me a little of a noodle or chewy dumpling...not chewy in a bad way. My mother always added them to her potato soup and I do too, I like the different texture it adds to the soup. If you don't want to add them, they can be omitted but I would suggest you try them at least once. You'll need four egg yolks for this, be sure to separate the eggs while the eggs are still cold. If you don't want to use the egg whites right away, freeze them for later use....once I had enough, I made an angel food cake.
Add flour to eggs and toss until almost dry. I added 1/4 cup of flour here.

At this point I have added another 1/4 cup of flour making it a total of 1/2 cup. The yolks are still very wet and the mixture is still too sticky.

I added another 1/4 cup of flour for a total of 3/4 cup and it was just right. I was using the yolks from large eggs so if you use smaller or larger eggs, the amount of flour you need to use may be different. The mixture should still be a little damp but not sticky. At this point you'll have to use your "clean" hands to finish making the rivels.

Gradually stir in rivel mixture, add everything even any flour that may not have mixed into the rivels. Simmer for at least another 5 minutes. Add salt to taste...I even like to add a little pepper.

And here it is, potato soup like my mom used to make.....only a little creamier with the addition of the instant mashed potatoes. I like to just sit down with a bowl of this warm tasty soup and enjoy it on it's own or sometimes make a grilled cheese sandwich, but my favorite way to eat it is the way we ate it at my mom's kitchen table, with bread and butter. Mmmmmm it's so good and comforting!

I love this potato soup made just like this but one day I decided to try adding chicken broth to the soup instead of the water. I had just made a large pot of stock so added that to the potatoes in place of the water and then made the soup according to the rest of the directions. At first Michael and I didn’t care for it because it changed the flavor a little…well, it didn’t taste like Mom’s soup. Naturally, with the chicken stock it had a much richer flavor. The next day I reheated it and we loved it….strange but true. Now we don’t know which we like the best so I’m thinking it’s time for a potato soup cook off, I’m going to have to make both soups at the same time and have a taste test. We’ll have to invite family and friends over because, as much as we like potato soup, even we can’t eat that much.

Saturday, May 14, 2011

Chicken Tortilla Soup


Several months ago I saw a post on FaceBook about a giveaway on the blog A Well Seasoned Life, for the chance to win one of two Gooseberry Patch cookbooks. In spite of being the kind of person who never wins anything, I decided to take a chance and entered hoping to win either of the cookbooks. I didn’t need either one but I’m of the belief that one can never have too many cookbooks, although if you saw my house, you might say that isn’t true……I do have a lot of cookbooks. I love books, I love to read, and I love to read cookbooks, I read cookbooks the same way I would sit and read a novel. Anyway, much to my surprise, a few weeks after I posted a comment to win one of the books, I was contacted by Kim of A Well Seasoned Life, telling me that I had won one of the cookbooks, Mom’s Very Best Recipes. Several weeks later I received my new cookbook and immediately sat down and perused the book, placing little sticky notes all through it for recipes that I would like to try.
A few days ago I took some chicken backs and other chicken parts that I had frozen after cutting up a couple of chickens, and decided to make some stock. I just have to say that there is nothing better than homemade stock, if you’ve never made it before; you should give it a try….it’s really very easy to do. I know there are some good stocks in the supermarkets and I use them frequently but once you’ve made your own, you’ll know the difference. Ok, enough said on that subject. I couldn’t decide what to do with the stock, didn’t really want to freeze it, had made chicken and noodle soup a few weeks ago and didn’t want to make that again, would love to have some chicken and dumplings but Michael doesn’t care for that, so eventually decided to make soup. While I was trying to decide what kind of soup to make, it was suggested that I make chicken tortilla soup. Well, that sounded good but I had never made it before and needed to find a recipe. Suddenly, a light bulb goes on in my head (Believe me, that doesn’t happen very often, especially now that I’m retired…not a whole lot of thinking going on up there now days.), I should go through my new cookbook to see if I can find a recipe there. So I reached for Mom’s Very Best Recipes and actually found one.
Chicken Tortilla Soup

4 cups chicken broth
2 cups cooked chicken, diced
2 15-oz cans diced tomatoes, drained
1 16-oz can corn, drained
1 16-oz can pinto or red beans, drained and rinsed
1 1/3 cup salsa
2 tablespoons taco seasoning mix
Garnish suggestions: sour cream, shredded Mexican-blend cheese, corn or tortilla chips 

1. Combine all ingredients except garnish, in a stockpot over medium heat. Simmer, covered, for 30 minutes, stirring occasionally.
2. Top individual portions with desired garnishes.
3. While soup is simmering, make some crunchy tortilla strips toppers. Brush or spray olive oil over both sides of flour tortillas. Cut tortillas into narrow strips and place on a baking sheet. Bake at 375 degrees for 5 to 7 minutes, turning once or twice, until crisp and golden.
Servings: 6-8

My Notes
I didn't have cooked chicken so took two boneless, skinless chicken breasts and poached them in the chicken broth for 30 minutes. It came to a little more than two cups but I used it all anyway.

Since all the companies are now down sizing their products (Who do they think they're, fooling?) it isn't possible to purchase the size cans listed in the ingredients. Just purchase the next size, which is generally about 1/2 ounce smaller than called for, they work just fine.

The recipe doesn't call for it, but you may want to add salt and pepper to taste.

The soup is very mild, if you want more heat, use a hotter salsa, add jalapeno peppers or whatever pepper and/or spice you desire.

If you like to crumble up crackers in your soup, try using tortilla or corn chips instead, it's very good.
 This is the cookbook that I won....lucky me!

 Two cups chicken

Two cans diced tomatoes
 On can of corn

One can pinto beans, can use red beans or even a combination of the two.

Salsa - I used a medium hot salsa because Michael doesn't like a lot of heat. I thought it could have used a hot salsa and may try that next time.

Taco mix seasoning

Add ingredients to the 4 cups of chicken broth and simmer for at least 30 minutes. Stirring occasionally.

While soup is simmering prepare the tortilla strips by brushing or spraying olive oil on both sides of flour tortillas and then cutting the tortillas into thin stips.

Place on a baking sheet and

bake at 375 degrees for 5-7 minutes, turning once or twice until crisp and golden.

Garnish with tortilla strips, sour cream and cheese.

This was a good soup…a little on the mild side for my taste but as I said earlier, Michael doesn’t like a lot of heat. It can easily be made hotter by changing the salsa, adding peppers and other spice, whatever suits your tastes. I would imagine the milder soup would be more appealing to children since many of them don’t care for hot and spicy food. I like the fact that it was super easy to prepare…..a great recipe when you’re either in a hurry to get a meal on the table or just tired and don’t want to have to spend a lot of time preparing dinner.

Thanks Kim of A Well Seasoned Life and Gooseberry Patch for giving me this wonderful cookbook.  I can’t wait to try more of the recipes.
Related Posts with Thumbnails